Showing posts with label beauty. Show all posts

Monday, February 23, 2015

Extra Soft Chocolate Orange Whipped Body Butter (Pro-Tip Version)

If you aren't from the Canadian Maritimes then you *may* have seen the photos of the ridiculous amounts of snow and storm after storm (#stormchips !!!) we got in February. Perhaps, if you are the states, you may have seen a news shot of some snow in Prince Edward Island with the tagline "Prince Edward Island, ONTARIO"....

Just in case- PEI is not in Ontario, they are separate provinces (our equivalents to a "state") and one is an ISLAND. And Canada is not in fact referred to now as the country of "Ontario". Rant over.

Anyhoo, regardless it has been cold and snowy and dismal. Last night, the night before leaving for a three day work trip to even colder Cape Breton, that I ran out of body butter.

OMG I am OUT of body butter *screams internally while waving arms in a panic*.

So, despite the fact that I accidentally picked up and BOUGHT the tester for cocoa butter, I decided that desperate times called for throwing caution in the wind (and really, it looked like it was just opened so people could sniff the delicious chocolate-y goodness, and we live in Halifax where people aren't crazy so.... I felt pretty safe).

I realized as I was throwing the ingredients together frantically that I've adjusted or maybe "pro-tipped" my original recipe over time to make it faster and more efficient. And of course I thought I could share it with you! This recipe has less ingredients (cuz who can afford to buy cocoa butter AND shea butter these days??), takes about an hour start to finish and has some definite body butter tips. Enjoy!
(My Chocolate Orange batch- actually  made a whole other 500ml mason jar that isn't in the pic)

Pro-Tip Version of Whipped Body Butter (Extra softening version):

Ingredients:
5 tablespoons of cocoa butter
5 tablespoons of unrefined coconut oil
5 tablespoons of almond oil
1 tablespoon of castor oil (optional)
20-25 drops of EO choice (optional)

*EO Note: For stronger scents like peppermint or anise, less is probably good. I used orange this time and found it needed at least 23 drops for it to smell like those Yulemas time chocolate oranges. I suggest trying 10-15 and cautiously taking a smell to decide whether you need more. There are health cautions with using EOs- please look into it if you have any health conditions (or are pregnant).
*Castor oil: I added this oil since I had it already for making soap and it's "extra softening". So far, I love the tiny bit of extra silky smooth it's had for my skin!

Place stand mixer bowl in the fridge to cool while you're melting the oils. (This will help speed up the cooling process that takes the biggest chunk of time).

In a double boiler (or pot with 2 inches of water and a stainless steel bowl on top) add all the oils. Keep the heat at medium so you don't over heat or boil over. Once melted, add essential oils.

Pour oil mixture into the chilled stand mixer bowl and place in the freezer. Let chill until the oils harden to roughly an inch ring around the edge and pudding-y type texture in the middle. This may actually take 20-30min, depending on your freezer temperature. That said, the already chilled bowl AND using the freezer instead of the fridge shave off about 15-20min of wait time.

Scrape away the sides of the congealed oils using a spoon before starting to whip. Set standmixer to the highest setting (make sure you have the shield in place since the oils fly everywhere) and let'er rip for about 5-8min. If it was cold enough, the oils should quickly form white fluffy peaks but continue whipping (it's not like whipped cream, you won't "break" it). Continued whipping allows for more oxygen to enter the body butter and makes for a more creamy, melt in your hand while keeping the "whip" shape.

Halfway through whipping, slow to a stop the mixing and scrape the sides to make sure no congealed oils are missing the attachment. Start'er up again.

Once done, scoop out into 1 cup mason jars. This recipe makes about two to two and a half cups. Store one in the fridge. If you live in a hot/warm climate or home you might want to store them both. For myself, even in the summer, as long as it's out of the sun it doesn't melt.

Application tips:

  • This recipe does need a bit more time to soak into the skin. It's definitely different than chemical filled lotions. All you need to do is melt a piece in your hand, apply and I dunno, brush your teeth while you wait for it to seep in. Honestly though, I've been using it for years and rarely wait longer than 2-3min and the oils have never damaged my clothing. (Though I don't wear silk... so...).
  • This stuff also works amazingly on your face. Especially as a heavy night cream.
  • It should last at least a month, if not longer.
  • If it starts to smell "nuttier" or look kinda wonky- throw it out! Oils can and do go rancid, so keeping it in a cool, dark, dry place is best (My bedroom is usually dark during the day since we keep the blinds shut to preserve heat...). 

WHERE TO PURCHASE INGREDIENTS
In Halifax: I buy the cocoa butter and castor oil at Petes Frootique. So far it's the cheapest place I've found, but if you know of somewhere cheaper, let me know!
You can also purchase sweet almond oil and coconut oil at Petes, but some Superstores and Sobeys also carry it, and it's usually cheaper there.

Outside of Halifax: Most natural food stores carry these ingredients. Or you could order them online... although I am unsure it would be worth the shipping at that point.

Enjoy!


Monday, December 29, 2014

DIY Gentle Coffee/Oats Face Exfoliant

Why Hello There.

I hope you all had such a fabulous Yule and holiday season! Here in the EcoYogini house the past month has been a flutter with decorating, organic tree putting up and trimming, holiday party hosting and culminating with my brother's surprise wedding, organized in 8 days.

(Incidentally, I was also interviewed via skype for Accidental Yogist's "Yoga Chat" radio show on different winter holiday celebrations- my bit was on paganism and Yule :) I'm at the end, around the 1.5hr mark). 

This month has also been awful for my skin, particularly on my face. In recent years the skin on my face has become horrendously dry, I mean flaking off in embarrassingly large quantities with red spots of "not quite acne, but not quite rosacea" along my cheeks to finish it off. I mean really, is it even necessary?

I was so desperate that I started using my whipped body butter (with cocoa butter, shea butter and coconut oil) on my face every morning... to no avail. It was like the oils just sat on TOP of the flaky dry skin. Even the oil cleansing method, for which I only have time in the evenings to do, wasn't enough.

One morning I was so desperate that I used the body scrub made from coffee grinds, sugar and almond oil on my face (VERY gently). And whaddaya know? It worked!

Now, my face, being extremely sensitive (refer to rosacea comment), straight up coffee grinds (that I grind myself, so not uniform) with their jagged edges isn't truly the best approach to a face exfoliant. However, there is a lot to be said for using coffee on aging skin, as it is known to have a toning and antioxidant that can calm red skin effect. Plus a fresh supply will always be on hand.

I also have used with great success oats as part of my face routine. Oatmeal is filled with nutrients and vitamins that help nourish your skin, soothe dry itchy skin and helps to lock in moisture. However, due to my extremely sensitive skin, even using whole, slightly crushed oats, can be tricky as they still have sharp, jagged edges.

Finally, I wanted to choose my oils to add mindfully. Coconut oil has never been the be all and end all in moisturizers for my body. I always found lip balms, body butters and face moisturizers with coconut oils to be absorbed quickly and their benefits just as brief. It was like water on my skin. A quick search and I see I'm not alone in my (gasp!) sacrilegious views on coconut oil.

So... after much thought and research here is what I ended up with! It works beautifully, smells like a coffee-vanilla heaven and leaves my skin soft, moisturized and happy. Feel free to modify the recipe to best suit your skin, choosing oils that make sense for your skin type and NOT just because some blogger said it was the best oil ever. Facial skin is personal, yo.


Coffee Vanilla Gentle Face Scrub


1/4 cup of used coffee grinds
1/4 cup of ground oats
3 teaspoons of brown sugar
3 teaspoons of sweet almond oil
3 teaspoons of grapeseed oil
3/4 teaspoon of vanilla extract

(Local Haligonians: North Mountain Coffee not only makes the BEST tasting, ethical, organic coffees but the resulting grinds are more like a lovely paste and make the BEST scrubs! You can purchase their coffee at Smiling Goat and Petes Frootique!)
(Coffee grinds all soft and ready!)

For coffee grinds and ground oats use a mesh strainer and massage the grinds through, essentially leaving out any larger, more sharp grinds and oats. It may take a few minutes and you may have to do this in batches, but it's worth it!

Use a fork to mix the dry ingredients together and then add oil. You can always use less oil (2 tsp each was just a tad under oily for my liking, but would probably work just fine!). You can also leave off the vanilla- it just adds a bit of extra yummy smell.

Store in a small glass container. Use a spoon to extract about a teaspoon's worth in the palm of your hand (be careful not to get any water in the jar- it will go bad much more quickly with water), massage in gentle circles on your face. Gently rinse/wipe away either under the shower (close eyes, hold breath!) or using a wash cloth. Only downside? Your tub has little brown coffee grind bits that you'll need to wipe away. Pat dry!

Friday, July 25, 2014

GPB: Glowing: Soulful Skincare Review

Who here has issues with their skin? Yes?

Peeps, I have just finished reading a fabulous book by one of my fav bloggers/natural beauty product lovely: Yancy Lael. It has forever changed my views on my skin and my health.

On top of that- it was the perfect "eco+Yoga" fit for my skincare journey.

So. Curious? Click over to the Green Phone Booth for my review:


Happy New Moon :)

Thursday, December 12, 2013

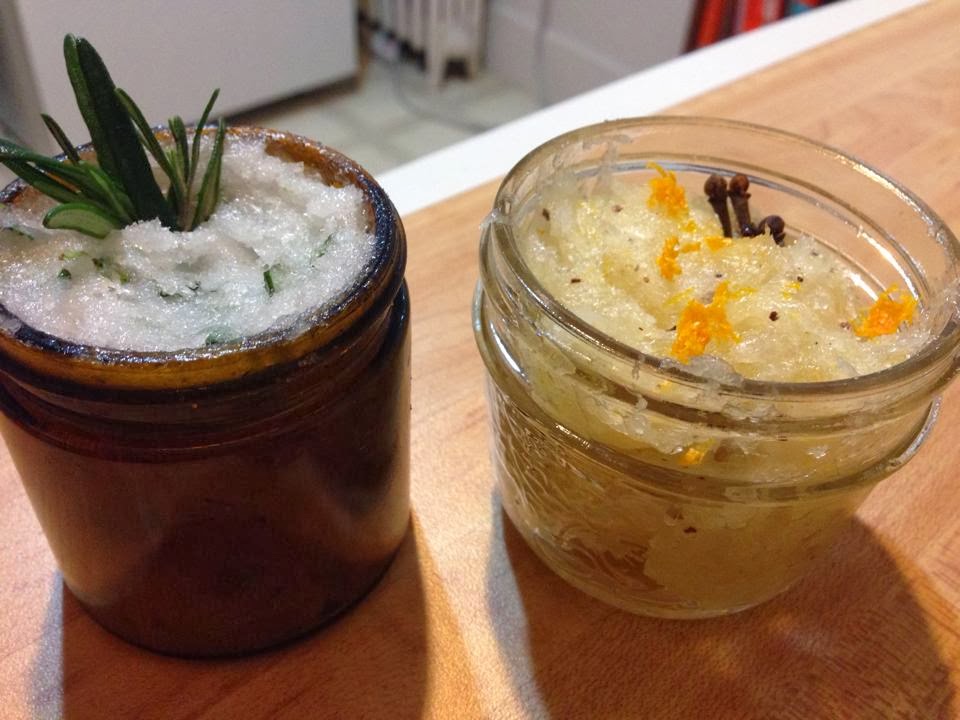
Delicious Simple Holiday DIY Lip Sugar Scrubs

I have discovered the most beautiful (and easy) lip sugar scrubs.

I've seen sugar scrubs at Lush (yes, my love/hate relationship persists, don't judge me), and thought: "I bet I could make those at home".

Yes, yes I can. And so can you!

Here are two recipes I found online that I thought I would include simply because the original recipes didn't include measurements... They take two seconds to make, taste fabulous and are a gentle exfoliant on dried out, chapped lips.

(Refrigerate, should keep for up to 2 weeks, allow to sit for a few minutes to warm up before use)

(Original recipes from Brit+Co Nov 12th 2013)
Peppermint Rosemary
125ml mason jar

3 tablespoons of white sugar
3 tablespoons of coconut oil
1 tablespoon of fresh chopped rosemary
1 teaspoon of peppermint extra

In a bowl, using a fork gently mix the ingredients together (use the fork like you would a pastry cutter). Transfer to the mason jar and voila- tasty, breath freshening lip scrubs!

Orange Clove
125ml mason jar

3 tablespoons of white sugar
3 tablespoons of coconut oil
1 tablespoon of freshly squeeze (organic) orange juice
1 tablespoon of local honey
1/2 teaspoon of ground cloves (I actually ground mine in a mortar)
1 teaspoon of orange zest

In a bowl, using a fork gently mix the ingredients together. Transfer to the mason jar and enjoy the moisturizing deliciousness of the holiday scents!

Monday, November 25, 2013

DIY Gift Idea: Delicious Chocolate Coconut Bath & Body Oil

My obsession with baths (which isn't very green of me) has resulted in quite a bit of moolah spent at Lush. We all know of my love-hate relationship with Lush, no need to revisit that here.

As my bath melts weren't my favourite (nor time saving) Lush replacement, a few months ago I made some bath oil just from straight up sweet almond oil and essential oils. It was ok... but I thought I would pizzazz it up a bit...

The result? A delicious smelling, perfectly moisturizing bath oil that is easy and cheap to make! It's been test run (three baths so far!) with glowing results.

Bonus? It makes a lovely environmentally friendly Yulemas gift!

Divine Chocolate Coconut Bath and Body Oil
(Recipe fills a small, 125 ml, glass jar. For larger batches, double or triple)

Hardware: Double boiler (or large pot w some water and metal bowl)
                  Glass jar
(I saved tincture jars from my Naturopath since they have smaller openings and are tinted glass which keeps oil longer. That said, I'm fairly certain you could just use a jam jar)
                 Measuring cup w spout (for easy pouring)              
                 Optional: paint for the label

Ingredients: 1 tablespoon of coconut oil (unrefined so you get the yummy coconut smell!)
                  1 tablespoon of cocoa butter
                  8 tablespoons of sweet almond oil (or another oil of your choice)
                  10-15 drops of the essential oils of your choice (mine: Rosemary & Peppermint-split)

STEPS:
1. Set up the double boiler, add the cocoa butter (melt in microwave so you can scrape out the tablespoon) and coconut oils. Allow to melt.
2. Add the sweet almond oil.
3. Pour mixture into the measuring cup (or bowl)- add essential oils to preference.
4. Mix together and pour into your jar.

That's it! I've found about 2 teaspoons per bath (under running water) is perfect. Be careful though! The tub gets slippery afterwards, so make sure you exit safely and clean out the tub.

I've also test run the oil as a body oil and it is lovely. Not too heavy, so perfect on these increasingly dry days as a mid day moisturizing up or a night body moisturizer.

Tie a ribbon, add a pretty label and VoilĂ ! You have a gorgeous, healthy and eco-friendly Yulemas gift!

Monday, October 28, 2013

My jeans are too tight: battling with a lifetime of bad self talk

I am wearing jeans that are too small. Yep, these past three weeks I have had a record low in physical activity. I just can't seem to find ANY reasonable time to practice yoga...

See, I believe we don't talk enough about body acceptance, body image and how our culture, self talk and the media plays into how we feel about ourselves. Oh, we wax poetic, especially in yoga, about accepting ones own body, practicing with mindfulness, within our own means.

However, the reality is that we all have moments where we ruminate on how our jeans are fitting. On being stronger/thinner/prettier.

It's an interesting and tricky thing to balance the need to stay physically active in order to be healthy without stepping into being physically active and dieting in order to be thin.

If we peel back another layer to this "health" onion, we have to acknowledge the barriers to living a physically active and healthy life, especially in yoga. One layer involves being able to adjust our lives to allow for the time to practice. Most of us have to work full time and need to make choices about how we spend our evenings. Some evenings I don't practice yoga because I really just want a break from ANY obligation, including yoga.

Another layer deeper and we can talk about the cost, primary and hidden, of being active. Yoga classes cost money, even the cheap ones. In order to save, I practice yoga at home. It was a choice I had to make. Many people don't have the luxury to take away from working and family life to even consider attending a yoga class. Most classes require that you have transportation to get there (not everyone lives within walking distance to a studio, and public transit is time consuming and unwieldy, especially in Halifax), some sort of appropriate clothing and a yoga mat (or a rental, an extra cost).

Even running, which is generally free, requires a good pair of running shoes or you quickly encounter injuries to your feet, knees and legs.

Today I listened to a radio interview of the hidden health costs of living in Suburbia (on top of the environmental costs). As we are basically going one step further and looking for a house in rural areas, this was an interesting listen. Basically, the further you get, the more you have to drive to get places and the more illnesses from a sedentary life pop up. So, we'll have to work EXTRA hard to stay physically active once we find our first forever home. (No, we can't afford an urban home and even if we could, we don't WANT to live in the city or suburbia. The author being interviewed totally missed that point).

This entire post, though, was prompted because I feel fat in my jeans. There. I said it.

My plan for November, to get back into the yoga habit (which does end up making me feel better all around... my body is screaming for it):
- Tuesdays and once a weekend (and hopefully another evening of the week) are yoga nights
- Wednesdays and Fridays are walk around the neighbourhood with Andrew nights.

Hopefully that will get things back on track.

Now... I think this means I have to go jeans shopping....
-

Monday, August 12, 2013

The Magic of Face Cleansing that is the Oil Cleansing Method

For the past week I have been cleaning my face each night with oil.

Yep, pure oil. Oil Cleansing Method or OCM for us cool peeps.

And I love it. My face looks and feels like magic (the youthful Harry Potter, happy kind, not the Magicians Lev Grossman kind), I have *less* (again: LESS) acne and basically it's like a party on my pores. A pores partay if you will.

You may think I am completely bonkers, but the oil cleansing method is actually a "THING". A Thing that I have pehshawed (shamefully) as being for the Other, AlreadyAcneFreePeople. You know who they are; the mystical perfectskinpeople.

However, I will assure you, there is a GatewayOilCleanser to this fantasticalness: Lush's Ultrabland. This Gatewaydrugcleanser actually looks more like a lotion- hence the higher acceptability quotient. After a week of using it though, it quickly became apparent that Ultrabland is really a glorified oil cleanser.

(My beautiful oils!)

So- when Yancy at FiveSeed made the sad and courageous decision to close up her natural beauty product shop and had a blowout sale, I took a deep breath and bought her Panacea oil cleanser and her Flower Elixer (which I had already purchased and loved). (ps- there are still some unbelievable products available at 40% off- check em out!).

I am converted. Forever. And so should you. Your face will thank you.

Why Oil Cleansers Actually Work:
We are so used to having a foamy, dry, oil sucking sensation from our cleansers equal "clean". However, the reality is that our face NEEDS oil to be healthy. Our skin secretes oil naturally, all.the.time.

You know how oil doesn't dissolve in water? As chemistry would have it, the concept of 'like dissolves like' means that oil dissolves oil. This means that we are allowing cleansing, natural, healing oils melt away and replace icky, dirty face-oil.

This beautiful, natural, healing oil PREVENTS your skin from working overtime to replace stripped away oils (like it would from traditional cleansers), which in turn prevents irritation, the overproduction of oil and in summation: acne. Booyah!

What Oils Work Best?
According to Crunchy Betty the number one reason why the OCM isn't working for you may be the use of coconut and olive oil. Apparently they are NOT ideal for cleansing and can cause acne and irritation (read the comments section for more personal stories on this).

I find Crunchy Betty's "Nitty Gritty on the Oil Cleansing Method" the best place for figuring out the type of oil that works for your skin and the ratio of mixing those oils. It all comes down to getting yourself some castor oil and finding the right carrier oil for you.

How Do you DO IT?
  • Massage a quarter sized oil blob directly onto your DRY skin. Massage slowly upwards for about a minute. 
  • Using a facecloth wet from very warm (almost hot) water, slowly and gently remove all traces of oil from your face. You can hold the facecloth on your face for several seconds for extra goodness before removing the oil. This 'steaming' of your pores by placing the washcloth on your face for several seconds helps remove impurities and really cleanse your skin.
DONE!

(I actually finish with massaging the healing Flower Elixer for my sensitive, damaged and scarred skin...but you may find that you don't need anything else!)

Options:
  • You don't have to do this every night. I have been, and it's been wonderful, but maybe you'd like to start out with a MWF type routine. 
  • Instead of traditional cleansers on your "off oil" nights try something natural and less skin-confusing such as honey. (yep, I said Honey. I am just going all bonkers in this place! I wash my face with honey every morning and not only does it taste delicious, it works!)
  • Consider trying for a weekly or bi-weekly uber cleanse and a quicker, less oil and less massage-steam cleanser for your regular routine. (This description, at the bottom of the post, for the uber cleanse is fantastic).
  • Add a few drops of essential oils depending on what your skin needs! Just be sure to check for your own skin sensitivity to the essential oils first.

Have you tried OCM before? Go on out, give yourself and your face a green treat and come back here, letting me know how it went! I dares ya :)

Friday, August 9, 2013

GPB: Going Grey: Some decisions are more than simply environmental

Some choices we make in our lives aren't "environmental vs feminism vs spiritual vs health" but a combination of all or several.

Like, for example, deciding whether or not to allow your hair to go grey.

My most recent post at the Green Phone Booth explores how the decision to go grey is more to do with social and cultural pressures (and feminism) and less to do with an environmental choice.

Do you struggle with this choice? Go check out my post (and the inspiration linked within) at the Green Phone Booth and please; comment away and share your thoughts and perspectives! The more we are open about these topics, the less ashamed we will be.

Friday, July 26, 2013

GPB: My Thoughts on Arbonne

After my Lush post earlier this week I got some comments and questions about my passing comment regarding Arbonne.

So... I wrote a blog post about my thoughts on Arbonne over at the Green Phone Booth today. Go check it out!

Tuesday, July 23, 2013

Being a Smart Lush Consumer: A Confession

Four years ago I "Broke up with Lush" and wrote a blog post about it. 

I still stand by most of what I had written four years ago.

But lets face it, like most break ups I was initially angry: I hate being mislead. After four years to calm down and cycle through more, ineffective, eco-beauty and bath products, I have mellowed in my perspective.

*Leans in*... Secret sharing time: I use some Lush products.

Honestly? I have come to the conclusion that compared to other beauty companies (*cough* Arbonne *cough*) I LOVE Lush's transparency. You can easily go on their website and see every single ingredient AND (albeit their) definition. What is more: the staff at Lush stores don't make me feel like a huge freak for: a) wanting to know what the ingredients are b) saying "no thank you" if there are ingredients I don't like or c) sharing that I make my own beauty products. They get it. 

I have come to the conclusion, that Lush is a company you have to shop intelligently. Kinda like Frenchy's: if you take the time to search and sift through the bins you'll find a brand name outfit. 

I have found a few items that are pretty "clean" (ie no scary synthetic ingredients) or low on the chemical scale... AND they work beautifully. 

Ok, so this shampoo still has some not so awesome ingredients (a quick check on skin deep places a few in the moderate to high risk, admittedly on limited data). However, since all pure eco shampoos have destroyed my hair, for a middle of the road crunch, Fair Trade Honey does very well. I love that 50% of the ingredient is honey which means they don't use preservatives (like parabens). 
What I love most though? That it actually makes my hair super soft and beautiful. I can't use solely the Honey Shampoo though, within about five days my hair becomes limp locks-r-us, but it is helping to cut my chemical shampoo burden without sacrificing pretty hair. Score!

(ps- if you are one of the lucky people who can do nopoo shampoo, or love a truly "eco" shampoo, I am jealous. Please believe me that my hair never recovers from the "detox" phase of green shampooing. Shampoo is one of my eco nemeses, and one I am happy to have found a successful lessening of toxicity).

I am in love with this product. Did you see the ingredient list??? ALL GREEN BABY! WOOT! This means that there are NO synthetic chemical ingredients. YEAH!

This cleanser is dry, so you add water in the shower, meaning no preservatives. It smells delicious (lavender) and has a *very* gentle exfoliation component. On my uber sensitive, rosacea prone skin, this moisturizes and cleanses without any left over redness. Like magical goodness.

It would have to admit that it is just as good at exfoliating as my oatmeal lavender DIY face scrub and more moisturizing. It has been handy since I am lazy and ran out of oatmeal scrub.

The face mask experience was years in the making. If you bring in five clean black containers you get a fresh face mask... This happened to me a month ago and I chose Cupcake (mostly because it smelled like yummy chocolate). It was amazing. I loved the smell, my face felt fabulous afterwards and... the ingredients are ALL in the green.

The downside to the face masks is they all have pretty limited usage timelines. Like a week. Honestly, my face can't handle a face mask every night for an entire week. So I only got one use out of it. But it was a lovely moment in time...

Dreamtime and Mango Bath Melts
Dirty secret revealed: even though I made my own bath melts... I still love love love Lush's... Thankfully my two favs: Dreamtime and Mango, have almost no synthetic ingredients. In fact, Dreamtime has Laureth 4 which rates a low on Skin Deep (it also has Geraniol which rates a "moderate to high" risk... but I'm not exactly sure from the description I understand why).

I cut mine in half so they last longer.

So there you have it. I don't consider Lush as THE best environmental option. Many of their products have some not so green ingredients and if you have ANY sensitivities to scents, steer clear of their stores. (I tried a few body lotions, beyond the fact that they have chemical ingredients, they left me smelling like a walking perfume ad all day- ick!).

That said: I do think it's possible to find either a compromise on a product from an informed decision that you can live with, AND even some squeaky clean products that will meet all your "eco" criteria. You just need to be diligent, read the ingredients and ask questions.

And don't be afraid to DIY it up! (check out my DIY section for some ideas, or Crunchy Betty and Nerdy Farmwife for others!)

Thursday, May 23, 2013

A Comment on Lush's "Derived from Blueberries" Parabens

We all know that "parabens" are sketchy right? In case you're like "para-what?" here's the low down:

Parabens (methyl-, butyl-) are used as preservatives and can be hidden under the "fragrance" ingredient in most commercial cosmetic products. They also mimic estrogen behaviour and there have been studies questioning their safety. 

The problem is that parabens easily penetrate the skin and enter the bloodstream and the European Commission of Endocrine Disruption categorize them as a 1 priority as parabens discrupt hormonal function.

But what if they are "derived" from food? What if they are labeled "food grade"- that makes them safe, right? It would appear that parabens also appear in low levels in certain foods, so if we eat it, it should be safe.... right? 

Lush makes the connection that parabens are found in certain foods like blueberries and some of their customers are under the impression that they actually derive their parabens from berries.

Well... there's arsenic in apple seeds, but that doesn't make it safe. Just saying.

The problem with this reasoning, other than the fact that just because it's naturally derived doesn't automatically mean it's safe, is that parabens in food is not the same thing as parabens in cosmetics.

1. The paraben levels in food are low and are easily metabolized through our digestive system that is well equipped to handle naturally occurring levels (or we'd all have died off from cancer thousands of years ago...). Our stomach acids are hardcore, and often destroy most harmful substances prior to reaching our bloodstream.

2. However, when applied directly to the skin, parabens are easily absorbed and enter our bloodstream intact. This results in a higher probability that they may affect hormonal function.

3. Finally, the studies on paraben safety haven't looked at the interaction between the dozens of products containing different parabens that enter our bodies through cosmetics. According to David Suzuki, some studies show that women are exposed to over 50 mg of parabens per day from cosmetics. Even if each individual product has "low" levels, combined they add up.

So... the next time a company tries to sell you the safety of their "naturally derived parabens"- politely inform them to eat some apple seeds... 

Monday, May 13, 2013

Psst: Strong is the New Skinny, Pass it On!

"This Trendy "Strong is the New Skinny" Thing (and what it could mean for the next generation of girls"

I just read the most badass article above and I have to share it with you. No really. It was ridonkulously amazing. If you are a woman, if you are a HUMAN, you should read this.

I feel that Sophie's message, besides being so entertainingly, yet poignantly written, is an important one to share. Important for the girl I was and the woman I am. For all my other girl-woman peeps who struggle with body image, disordered eating and self-esteem. So I'm sharing my perspective, my take, with you.

What if: "Strong is the new skinny"

Yes. Exactly. What if, when I was a girl, I was told to strive to be strong instead of thin. What if the message society gave me was that a strong woman was of ultimate value. Would my adolescence, my early twenties, have been different?

If you read my blog, you know that I've struggled with disordered body image and eating my entire life. Oh, it's not clinical- I've never demonstrated symptoms to the clinical level. But raise your hand (mentally) if you've: a) known someone who lost their period due to weight loss b) looked in the mirror and wailed internally over your fat-ugly______ c) felt proud that you skipped a meal d) felt happy that your jeans were loose e) gone on a fad diet, or any diet f) felt that your current weight or body shape, whatever it was, just needed a bit of improvement g) heard someone say that the best part of having the stomach flu was the weight that you lost....

Yup, yup, yep, been there for all of them.

After devouring countless books and research articles on feminism, body image, female health and our relationship historically and culturally with the media, I am a strong believer that this "body type ideal" of tall, thin and waif-like is enforced upon us artificially by the beauty, fashion and advertising industry along with a healthy dose of patriarchy valuing women for extrinsic qualities such as ideal beauty and as sexual objects.

In a way, this can be viewed as a positive thing. Unlike evolutionary psychological theory (which honestly I feel is a load of self serving, patriarchal, narrow-minded crap- we are not apes and behaviours that *may* have occurred a millennia ago can be explained by the-very different- social construct, brain and cognitive development and lifestyles homo sapiens led: ie social and culture and NOT irreversible genetics) our social mores and culture can CHANGE.

What if girls are told from a young age to be strong, intelligent, caring, courageous instead of thin, pretty, "nice" and gentle? My thinnest moments were when I was stressed and unhappy and I know for a fact I was not eating enough to nourish my brain- which obviously results in poor cognitive functioning, problem solving, emotional regulation and concentration.

You know what was my fucking unicorn moment? When my unflexibility forced me to improve significantly in my strength endurance in yoga. When I looked in the mirror and saw the gorgeous MUSCLES in my back and arms. When I could hold dolphin plank longer than my weight lifting husband. It was like suddenly the fear of 'bulking up' (which is a ridiculous myth btw) disappeared into the excitement of being fucking STRONG. 

Just last night I poked my belly to feel my awesome abdominal muscles I've been building. I may have even showed them off to Andrew. I am so excited with my body right now, and I am currently at my "heaviest" and highest dress size.

This is to say that I feel it's a bit DESPITE yoga. I know. But I feel the focus on yoga asana (for the most part) in popular western yoga is to be thin, lose weight, "toned". Even the examples of strong yoginis we have as famous role models are still (white) thin and strong. (Now, we know there are some strong fabulous yoginis who are bucking the system- I heart you! We need MORE of you!).

This is where Sadie's snarky post at Huffpo makes me cringe. Perhaps instead of making others feel like yoga is the ONLY solution to being strong and healthy, we should simply encourage women to be STRONG however best that works for them. Our bodies and selves do not fit in a cookie cutter mold, one size fits all model. So why assume yoga to be the panacea in this diverse reality?

Strong is the new Skinny- Pass it On.

Friday, May 10, 2013

GPB: Navigating the Eco-Beauty Products World

Ever find yourself trying to green your beauty product (baby product) routine and want to scream at the overwhelming amounts of information and choice?

Me too... at the Green Phone Booth today I share a few of the tips that have worked for me over the years- Navigating the Eco-Beauty Products World: go check it out! :)

Monday, March 25, 2013

DIY Scented Bath Oil

Although making bath melts was fun, sometimes I just want a light bath oil with a scent that can be whipped up in five minutes.

Enter: DIY Scented Bath Oil

Safety First:
Although essential oils are used frequently in the environmental and yoga worlds, it's important to remember that "natural" does not always equal "safe". If used properly, essential oils are a wonderful addition to your green and yoga lives.

General Safety Guidelines:

  • Do not place directly on your skin. Essential oils are very concentrated and should be diluted for topical use. 
  • If you have a serious medical condition or you are pregnant (congratulations!), please consult your family physician (or Naturopathic Doctor) prior to using essential oils. 
  • Do a test patch of bath oil on your skin prior to bathing... immersing your entire body in a allergic reaction in waiting doesn't sound like fun eh?
  • Some essential oils can be toxic to our drinking water supply (i.e. tea tree oil), please check prior to disposal.

(For more detailed guidelines- check out Mountain Rose Herbs.)

DIY Scented Bath Oil
STEP ONE: 
Choose a vegetable carrier oil that will feel lovely for your skin. I used Sweet Almond oil because it was affordable and I can use it in my whipped body butter. Other options include jojoba oil, grapeseed oil, argan oil, apricot oil and even olive oil (although the smell of olive may come through your essential oil blend).

STEP TWO:
Choose your essential oil(s). In a glass (or ceramic) bowl mix in about 15-30 drops (depending on strength of scent) of your essential oils until the combination and scent is what you wanted. What I have recently discovered: anise+vanilla+cocoa=marshmallow. Just saying.

STEP THREE:
Add in about 2-3 oz (ish) of your carrier oil. Mix with a spoon. Give it another smell to make sure the strength of scent is what you'd like.

STEP FOUR:
Pour mixture into a clean, dry small glass container. I happened to have a few random jars from previous products all cleaned out. If you really want to assure that your oil will last for months, store in a tinted glass jar that has been sterilized (boiled in water and set to dry- like canning jars). Store in a cool dark place.

STEP FIVE:
In the running water of your bath, pour about 1 tablespoon of oil. Make sure your bath water isn't too hot as your oil will also heat up.

Please note- when getting out of the tub be careful!! Everything will be super slippery.

Enjoy a beautiful, synthetic chemical free moisturizing scented bath!

Sunday, February 24, 2013

An Eco-Face Routine for Sensitive Skin

EcoYogini's Eco-Face Routine:

Non-cleaning steps:

  1. Wash makeup brushes weekly. Makeup, sweat, dirt particles stick on those bristles- rubbing that all over your face only helps breakouts. Using your shampoo, gently clean and allow to dry overnight.
  2. Rinse out the conditionner from your hair BEFORE you wash your face. Conditionner along the hairline of your face can cause breakouts.
(NB: I have Rosacea, combination skin and I tend to break out. I started using this routine because all of the 'sensitive skin' moisturizers and facial washes made my face enflame. Including straight up oils like 'jojoba' and 'almond' oil. Everyone is different, but this is what works for me).

(My honey jar all full!)

My face staples:

  1. Honey as a face wash. It's been two years since I've ONLY been using honey to wash my face and I would never go back. It's the only thing that cleans without drying out my skin or making it bright red and blotchy. I use raw honey that I buy from the market (and Halifax crafter's) so it's unrefined. 
    • Why Honey? It's moisturizing, anti-microbial, antibacterial, it's gentle, it's cheap, and healing. Check out Crunchy Betty's blog post for more details on why Honey as face wash rocks.
    • Unrefined honey means that it can crystalize easier. The little crystals add a gentle exfoliation aspect (feels like sugar). You can easily control the amount of crystals by rubbing the honey between your hands more (for less crystals) or less (for more exfoliation action).
  2. Lavender oatmeal exfoliant mix. I got this idea from a store bought version and though to make my own. It's so easy, lasts forever and affordable! It leaves my skin gorgeously soft (the oatmeal) and is extremely gentle. I've convinced my friends who all now have their own oatmeal lavender stash as well. 
  3. Almond or jojoba oil as eye makeup remover. Honestly, I'm not sure why people even buy makeup remover when a drop of oil on a q-tip (or homemade felted squares) works just as well. AND it's moisturizing along your peepers!
  4. Flower Elixer by Five Seed. This fabulous mixture is made with healing oils that are infused with healing herbs and it smells just like Tang. No really. I use a few drops only of this after I wash my face at night. It has been amazing.
(My oatmeal lavender scrub all ready to be jarred!)

My one not so chemical free face component is my actual daily moisturizer which is currently Lush's Celestial. It works beautifully but does have parabens which doesn't make me happy. I've been so impressed with FiveSeed's Flower Elixer and how my skin is actually happy with straight up oil that I might try argan or sunflower oil... I will keep you posted!

Tuesday, December 4, 2012

DIY Gift for the Yoga Dude in Your Life: Hair Pomade!

I like to give updates whenever possible- just because sometimes I make stuff that I think is all fabulous (like this DIY body lotion, a BAD idea) and then realize it was a terrible idea a few uses in. And then it gets pinned like a million times on pinterest and I feel a bit bad. Don't make the body lotion!

Anyhoo- this is a happy update just in time for the Holidays (as a gift idea!)

(Proof that my hubby LOVES his hair pomade... it's scraped right to the bottom!)

Seven months ago I decided to try making my husband Andrew some hair pomade. Just for the heck of it. I was tired of his gross chemical stuff and thought, what the eff, may'swell try to make my own out of beeswax.

Wouldn't you know it only takes about 20minutes MAX to make and it works like MAGIC. He loved it! It holds amazingly well, looks natural and not greasy AND it even washes out super easily. 

Two other amazing points: 
1) It has lasted him seven whole months.... (and technically there's still enough there for probably another week). 
2) It cost probably less than a dollar to make.
3) This pomade has TWO ingredients (beeswax and coconut oil) which means no nasty chemicals!


(My new batch that took less than 20min to make tonight!)

This recipe also fits perfectly in the 125ml mason jars... which is the perfect size for a gift!

So go grab some beeswax and give a fun, fabulous gift of eco hair pomade to your bestest guy yogi!


article and photographs by EcoYogini at ecoyogini.blogspot.com

Wednesday, November 7, 2012

The BEST DIY Whipped ChocoCocoMint Body Butter!

Despite the fact that Nova Scotia is almost completely surrounded by ocean, as of yesterday we have officially switched the "suck out all the moisture from the air and dry out your skin" season. And I had JUST run out of body butter last week- Hooray!
Look at all that whipped moisturizing stuff!

Thank goodness it's just so ridiculously easy to make whipped body butter, or I'd continue to be a flaking, itchy mess.

I am now creepily smelling my fingers every few minutes so I can inhale the delicious coconut, chocolate and peppermint scent of yumminess. I'm not even pretending to be subtle.

I tried this recipe about a month ago and it has been heaven. I've decided that this year for Yulemas everyone will receive a miniature gift package with ChocoCocoMint whipped body butter among other goodies. It'll be affordable, easy to make and delicious, all without the ick toxins. 

I think the most challenging aspect of this recipe is actually figuring out how long to leave the oils to harden before attempting the "whipped" process. The first time I didn't leave it in the fridge long enough and had to re-chill and re-attempt- but the end result was great. This time I left it in slightly too long, but the end result is still pretty darn fine. I was panicking though because several recipes have all these descriptive type instructions with vague photos. Bottom line, if it doesn't whip up, rechill for about 15minutes and try again.

ChocoCocoMint Whipped Body Butter

Time needed: 1hr (15min of actual work time)

Ingredients:
(makes 1 cup of whipped butter)

2 tablespoons of Shea butter
2 tablespoons of cocoa butter
2 tablespoons of coconut oil (the smelly kind!)
2 tablespoons of a liquid oil of your choosing
10 drops of peppermint essential oil (or scent of your choosing)
5 drops of clove essential oil
All you need is four (or less!) ingredients and an essential oil (or not!)

(Note: of course you could substitute or double some of these oils. The trick for the whipped butter to keep it's substance and not fall apart is to keep the ratio at 75% solid oil at room temp and 25% liquid)

In a double boiler melt the oils together (I just put a metal bowl over a pot with a couple of inches of boiling water- instead double boiler!). Pour into a ceramic bowl, add essential oils and stir. Place in fridge for about 45min until a good inch around the edge has hardened and the middle looks kinda goopy. While waiting, read a fantastically fluffy (or good) book.
Unfortunately, I left mine in the fridge for too long- so it shouldn't have been this solid. But it still worked! Also, I added some oil that had herbs soaking for extra healing oomph. Some of the herbs escaped into my butter oil...

Scoop goop into a stand mixer. Set on 7 or 8 with the whipping attachment thingy and watch it go! The first time I tried this, nothing really happened except it looked a bit froth-y. If this happens to you, just rechill for another 15min and try again. 

Just yellow goop when it's first scooped in!

Whip until it makes fluffy peaks (it should also thicken in consistency). 

(You could potentially handwhip this, or maybe use a handheld mixer, or borrow a friend's standmixer- but then you'd probably have to share the spoils)
.
It's amazing how it turns completely snow-white in a few minutes!
yum yum!

Spoon into a small jar and Tahdah! Done! This lasted about a month for me, but that was because I LOVED the stuff and glopped it on every day. Put it on right after the shower, do a few things before getting dressed and the oil shouldn't rub off onto your clothing and within an hour should be all absorbed into your skin!
The most delicious body butter EVER!

article and photos copyright of EcoYogini at ecoyogini.blogspot.com

Sunday, September 23, 2012

Easy DIY Solid Chocolate Peppermint Body Bars

This week has been pretty rough. From travelling and working late nights, to having a run-in with some critters from a B&B (thankfully contained but the aftermath is horrible) to finally topping it off with a good dose of the flu.

Due to said critters which will remain nameless, I have uncomfortable arms and legs that could really use some soothing peppermint body butter.

I had tried a solid body butter a few weeks ago, but sadly it melted at room temperature. A quick look at other body butter ingredients and they all contain: Beeswax. Thankfully, I had purchased some solid little nubbies of beeswax at the Seaport Farmer's Market a few months ago (25 cents a piece!).

 (I am loving these unused previously as muffin silicone containers robo-moulds for my melts and body bars!)

I just tried the solid bar this morning and it was lovely and smelled like chocolate lavender peppermint... mmmm.

The trick to using more oil-y natural moisturizers is to do as much as you can BEFORE you get dressed, allowing the natural oils to soak into your body: brush your teeth, do your hair and makeup etc. This recipe should last 3 months outside of the fridge, or 6 months in the fridge and should make two 2x2 bars. Feel free to swap some of the oils, but I would stick to a 75% solid and 25% liquid oil so it doesn't fall apart OR add more beeswax.
(beeswax being chopped up!)

Solid Chocolate Peppermint Body Butter Bar:

Equipment:
Double boiler (I just use a pot with 2 inches of water and a metal bowl on top)
silicone type mould (you could try plastic or glass, I'm just not too sure how you'd get the bar out)
Ceramic bowl

Ingredients:
Beeswax (should be able to find at a health food store or farmer's market)
1/4 cup Cocoa Butter
1/4 cup Shea Butter (feel free to use one instead of both, just double the amount)
1 tablespoon Avocado oil (or another liquid oil)
10 drops Peppermint essential oil
5 drops Lavender essential oil

Chop beeswax into six 1 inch long and 1cm thick sticks. Kinda like your pinky finger. Bring water in double boiler to a simmer and place beeswax in double boiler.

Once the beeswax is melted, add the Cocoa and Shea butters and the avocado oil. Melt together.

Pour melted mixture into the ceramic bowl. Add 10 drops of peppermint oil and 5 drops of Lavender oil (feel free to mix it up or add more peppermint- it tends to dilute in scent once it hardens). Stir with a spoon and then pour into your moulds.

Place the mould in the fridge until they harden (if you can wait overnight, that is ideal).

And... you are done! Total work time should be: 30minutes.

(Robo-body butter bar!)

Uses for Chocolate Peppermint Body Bar:

  • Travelling- no spillage, no mess!
  • Refreshing soothing rub after a yoga class- easy to put in your yoga mat bag!
  • Nourishing dry skin during winter months.
  • Easy Yulemas gifts
  • Massage bars.... ;)


article copyright EcoYogini at ecoyogini.blogspot.com

Wednesday, August 29, 2012

DIY Easy Bath Melts!

I love Lush bath melts. A lot. It's sad, since although Lush is great at disclosing full ingredients, they do still have synthetic and sketchy chemicals AND dyes (do you think bathing your hoohah in bright purple sparkles is really a great idea?). The thing is, aching and tense muscles, especially after a yoga class, feel so fabulous in a bath. 

Since I've discovered that making sugar scrubs, face exfoliants and body oils are ridiculously easy to DIY-ify, why not bath melts? 

About six months ago I gave it a try using our ice cub trays as a container. The problem? I also added honey and lavender buds to the mix which resulted in a gross, sticky mess. The hard plastic of the ice cube trays combined with the goopy honey made it extra difficult to get them out. 

A recent trip to Lush and I have succumbed to indulging in a few melts. After checking the ingredient list online, I've decided that I should be able to make these at home. The trick? Just enough cocoa butter and bit of coconut oil for it to solidify without being too oily. 

 (teehee, I LOVE their robo-faces!)

Combine that with these cute silicone robo-muffin cups that Andrew received as an xmas gift that he's never used and we have the most rockin' DIY bath melts in Halifax... if I do say so myself :)

Here's my basic recipe- with a couple of extra thoughts that I'll be trying for scent combos:

DIY Bath Melts
Cooking needs: a double boiler, or a pot and metal bowl.
Something to set the bath melts- an ice cube tray will work, but silicone muffin cups are fantastic. Sometimes you can find really neat ones at Value Village. 

Ingredients:
2 teaspoons of cocoa butter
2 teaspoons of coconut oil
6 teaspoons of sweet almond oil
1 teaspoon of jojoba oil
(any other types of liquid-y oil would work here if you wanted to substitute)
5-8 drops of essential oil of your choice 
1 vanilla bean inside bits (if you want vanilla scent, I think it would go nicely with a lemon or orange-y scent)

In the double boiler melt the cocoa butter and coconut oil together. Then add the liquid oils. Pour into a ceramic or glass bowl and add your choice of essential oils and vanilla bean bits. Pour into the container and place into the fridge for a few hours. Voila! Prep time is max, 30 minutes. You may only need half of each melt depending on the container. I'll be cutting mine in half or maybe even quarters. Store in the fridge to assure they stay solid.

Because you essentially only have oil (unless you use the vanilla bits) these should keep a long time. You could even give them as gifts and get real fancy, like adding chocolate!

article and photographs copyright of EcoYogini at ecoyogini.blogspot.com

Sunday, June 17, 2012

DIY Customizing Beauty Oils: Easy Cold Infusion

I have no idea why I ever bought body lotion now that I have my amazing cocoa/coconut calendula infused body butter. It was so ridiculously easy to make and works magically.

That said, infusing the calendula in a saucepan requires extremely low heat and a delicate hand... otherwise you end up with a stinky singed herb smelling body butter (which I suffered through for the last batch I made).

There's another way to infuse oils with herbs, it just takes a bit more planning in advance. Which I don't typically like to do, but my friend H. and I will be making a batch of cocoa/coconut body butter in a few weeks, so she stopped by today with a fresh batch of dried calendula petals and a promise that she would be infusing her oil in preparation. I can't be lazy and punk out now.

Infusing oils is all the rage in the eco-sphere, I am SO behind on this easy way to add some pizazz to my oils. It's just such a pain to research all the different herbs and what they're good for on the internet. I've just never had THAT much of an interest to go digging.

(The awesome chart with herbs and skin matches. Descriptions of their helpfulness are also included throughout the book)

Until, a few months ago at the Spring Crafter's Fair I bought this handy dandy book, "Make your place" By Raleigh Briggs that has a little table outlining a whole slew of herbs and what they're good for. Golden!

Infusing oil is a super easy way to customize your facial or body butters to suit your specific skin needs.

(My herbs all ready to go!)

A few important tips:
For cold infusion always use dried herbs. Honestly, you'll be placing these pretties in a jar for a few weeks on end. Fresh herbs have water which breeds bacteria. Bacteria like to grow in oil too, so you really don't want to be slathering bacteria laden oil on your face or body. You could always add some preservative (like vitamin e oil, or vodka...) but if you have fresh herbs think about drying them or infusing them using heat, just make sure you store your oil in the fridge and be conscious of it's shelf life.

For more info on how to DIY with water based products, check out Crunchy Betty's excellent post on the topic.

Also, this blog post on Lovin Soap Blog on how to colour soap naturally with infused herbs is amazing! I especially am interested in the slow cooker method.

Ok, now on to it!

Step One:
Sterilize your infusion jar for 10 minutes in boiling water. This is important, the oil and herbs are going to be sitting for two to three weeks. If anything is already in there you don't want it growing up to be a nasty on your face.
(Sterilizing equipment is not only easy, it's safest)

Step Two:
In dried and cooled jar, plunk in about two-three tablespoons of your herb(s) of choice. Today I chose Calendula and chamomile for their healing and soothing skin properties and licorice bark for it's anti-microbial properties (seriously, yoga+running+sunscreen+sweat= skin blemishes popping up not just on my face).

In Halifax it's very easy to find dried herbs: Planet Organic has a nice little apothecary type wall filled with jars of extremely affordable dried herbs. You could also find some at the market (there's a local lavender farm that sells products at the Seaport Farmer's Market for example).

Step Three:
Add enough oil to cover the dried herbs. Your oil of choice should be influenced by what you want to use the oil for. Olive oil and jojoba oil have a long shelf life, so they're great choices. I chose Sweet Almond Oil because I'm out of jojoba, and it will be gentle on my skin (and I have a bunch left).

Step Four:
Leave in the jar in a cool dark place for about two weeks. Shake once a day.

Step Five:
Strain out of the jar using a mesh strainer or cheesecloth. Tahdah! You have a just for you customized oil to add to your body/lip butters, bath melts or face oils!


article and photographs copyright of EcoYogini at ecoyogini.blogspot.com